Monday, August 30, 2010

Whats that sound? 600HP!

Today was the day we've all been waiting for.. well ok, it was one of the big days we've all been waiting for.. Today we fired up Thunderpig!!!! And it was awesome!!


The video camera didn't capture the sound of the engine as well as I had hoped but it's still pretty awesome.. :-)

This was my reaction after hearing the truck fired up for the first time since it was built!

The kids were pretty scared at how loud it was when it started (But after we started it the second time Logan wanted to see what all the noise was all about..)

This is the temporary setup used to fire up the truck.. manual gauges helped fine tune the engine. Later the wires will be run and the dash gauges will be permanently installed.

Check this photo out.. Zach's frown is absolutely priceless.. He doesn't like loud noises and after hearing the truck started twice he wasn't about to let us start it up again! Better get used to it Zach. Daddy's gonna be firing the truck up every chance he can get when this baby's finished! :)

Here are a few of the next big days we're looking forward to! Stay tuned

  • Start the truck up - Checkaroo!!
  • Finish the bed modifications - Next 2-3 weeks
  • Get the truck painted - Its already 1/2 way there! (next is to paint the bed and add flames!)
  • Drive the truck home - Hopefully about a month or so from now!
  • Finish the interior (seats, carpet, panels, and stereo)

Sunday, August 29, 2010

Rear Fender work

Dad's been busy helping Joe at the shop. Their recent project has been to modify the rear fenders so that they align better with the cab and step of the truck. Its gonna look really cool when its finished..

See how the step aligns with the bottom of the cab, but the rear seems too high? Well Dad and Joe are going to drop the inside edge of the fender down about 3" so that it will slightly rise toward the rear, making everything line up better.

Rather than cutting the entire lower half of the fender off and adding an extension to it, the fender was split so that a wedge of sheet metal can be welded into the fender changing the angle of the bottom fender edge.

Here's Dad cutting the fender..

The fender is flexible enough to pull apart so that a wedge of metal can be placed between it.

Here's dad clamping the fender in place so that the sheet metal wedge can be welded in place.

This is the other fender cut apart, shown with the wedge clamped in place.

Next on the list is to clean up the welds around the fuel door..

Now thats one determined look! Dad's saying to himself.. "Ok grinder.. you and me have got some work to do!"

Here is the drivers side fender with the wedge in place and the welds cleaned up around the fuel door. A little more work ahead to clean up the rest of the fenders and the bed, then it can be painted! Look'n good!

Wednesday, August 25, 2010

The Beer Truck

We've been working on the truck now for over a year and half! Can you believe it? After Joe sent me this picture, I can see why its taken so long! LOL!! Check out that stack of beer cans on poor old Thunderpig!


This picture cracked me up.. Especially given the fact that these guys are some of the hardest working folks you'll ever come across..

We were really blessed when we came across Joe's booth at the Thanksgiving Point Car Show in 2009 and he said he would be willing to help us restore my Dad's truck..

Thanks Joe, Eric and Donna for taking on the Thunderpig project, and for giving us some good laughs along the way! :-D

Truck Reassembly!

The front panels have been painted so its time to start putting Thunderpig back together!

We have lots of parts that have been painted and are just waiting to be put back on the truck!

Joe is installing the new hinges for the hood.. The old ones were pretty warn out and were modified so the hood would stay up.. Trust me, the last thing you want to hit your head on is the hood when it comes down on you.. So new hinges were one of the first new parts I ordered! :)

Dad putting on some edging to protect the inside edge of the inner fender where it connects with the cab.

Here's the new edging installed around the inner fender suspension cutout.. This stuff is cool. There's a metal insert inside that can be molded to the shape of the panel edge.. It really looks great!

Here is one of the inner fenders with the edging in place.

Here is the radiator support and drivers side inner fender ready to be put on the truck.

Inner fender installed.. Perfect amount of clearance around the front suspension too!

Here Eric, Joe and Dad are installing the front end on the truck.. With the new panels all nicely painted, everything needs to fit perfectly..

One last approving glance from Eric tells the story.. This baby is coming together nicely!

Monday, August 23, 2010

More paint pictures!

Thanks to my Dad and the guys at the shop, I've been getting lots of great pictures of the progress being made on the truck this week.. I haven't been to the shop since Friday, so I'm having major truck withdrawals.. Here are some new pictures from today!


Passenger side front fender.. I love this shot.. Look at how smooth and curvy the fender is.. This is what made the 1958/1959 pickups stand apart from the 1955-1957.. the Dual Headlights.. They give the truck a lot more character.. I love the way it looks.

Here is the drivers side front fender next to the hood and truck cab..

Another great example of how amazing the curves are on this truck.. the hood has a great design to it, and the paint really brings out the definition and contours..

The back side of the truck looks pretty cool with the slat impressions in the lower portion of the cab.. Its too bad the bed will pretty much cover this entire section of the cab.

Thunderpigs first taste of sunlight in months! Bringing the truck out to check out the paint in the sun.. Great work guys!

Eric and Ryan checking out how the reflection from the sun on the truck really brings out the shine of the metalic flake in the new paint.

Joe inspecting the doors and panels.. I have to say it again.. "Wow.. I've been waiting so long to see the truck finally get painted!" All of the work up till this point has been totally worth it!

Eric and Dad preparing the hood for the rhino lining.. Eric is taping off some of the hood so that only the hood panel itself will have the rhino lining, the bars and cross strips will remain shiny to give it a clean appearance when the hood is open. Great attention to detail on that one!
Dad doing a little bit of last minute sanding before Eric sprays the hood with rhino lining.. Check it out.. Dad's magic hand is back! He's sanding so fast all you see is a blur! :)

Here is a close up of the hood (notice the tape around some of the metal? That lets Eric spray the hood with rhino lining while keeping the support hardware clean with a smooth finish coat on it)

Here the tape has been removed.. You may need to click on the image to see the clean finish of the support braces next to the hood which was rhino lined.

Here's Eric spraying the rhino lining on the under side of the front passenger side fender..

Close up shot of the front fender with the new rhino lining sprayed on the inside of the panel.. !!RUST.. BE GONE!!

And there you have it!! The fenders turned out great and they really shine in the sun!

Sunday, August 22, 2010

Ow my eyes! The paint is so shiny!

Here are some new pictures that Joe and Eric sent over last night of the panels and cab they painted yesterday. The metal flakes have been mixed in with the paint and it looks like we may even have the clear coat applied! I'll find out more on Monday when they're back at the shop.

I just can't wait until tomorrow to post the pictures.. so enjoy! :)


The cab, front fender, hood and door look brand new!

This picture is great, you can see the metal flakes really well the way the light is shining on the door.

Front grill panel, front fender, and corner of the cab..

Great shot of the front drivers side of the cab..

Passenger side of the cab and the hood cowl vents..


The rest of the panels hanging to dry in the paint booth..

Can't wait to see everything come together on the truck!

A glimpse into Thunderpigs past!

Vintage Thunderpig!


Dad was going through some old photos and came across these rare gems! This is what the truck looked like when he purchased it from the City of American Fork back in 1967!


Click on the picture to expand it to full size (both photos should expand together)

A little history on the truck:
Thunderpig originally had a V6 235cid engine in it and was used as a pipe truck and a cemetary truck for the city before it was sold to my Dad.. In 1971 my Dad put in a SB V8 283cid and a few years later in 1976 he gave it a nice new paint job.. Almost 20 years later in 1993 my Dad figured it was time to teach his boys a thing or two about cars, so we set out to rebuild and install a SB V8 327cid engine.. We put corvette heads on it, and tweaked it as best we could.. I probably shouldn't say this with my Dad reading, but I was able to make the tires chirp going into 3rd gear! It had plenty of power.. Now with a brand new 454cid engine waiting for us, the truck is going to be freaking awesome.

Saturday, August 21, 2010

Prep and more paint!

I predict... More sanding... and much more paint in our future! hah! It's pretty amazing how much sanding and prep goes into the perfect paint job.. But one things for sure.. Dad and the guys at Horvath Hotrod know! And they have the sore hands to prove it!

Over the past month, the truck has been sanded down, primed, sanded down, bondo'd, primed, sanded, pounded on, bondo'd again, sanded, sent for first coat, and then sanded again before getting another coat!! And you know what.. its all worth it! The truck looks amazing.. And its not done yet!! :)

Here's Dad sanding the hood cowl vents on the truck.. each blade is hand sanded to remove metal sputter from the original manufacturing process.

Here's Dad sanding down the back side of the cab.. "Watch his magic sanding hands!" He sands so fast all you see is a blur!

Here is the radiator core support, primed and sanded.. Its hard to tell from the picture, but this is probabably in the best shape its been in 50 years!

Dad sanding down the door jam.. Its all about the detail! Joe and Dad joke about sanding.. You sand on a spot, you move on, then come back to the same spot and find something you missed that needs more sanding.. It just takes time!

Here's a close up on the cab.. as you can see, the firewall isn't being sanded because its already been lightly touched up and painted again before the cab was bolted back on the chassis.

The truck looks pretty cool with the flat red color (the sanded section) against the shiny red coat.

Truck taped off and ready to be repainted.

Dad wiping one of the front fenders down with Prep-sol.. They use this solvent to remove any remaining dust or debris from the panels before they're painted. Contamination can lead to small pock marks in the paint or what they refer to as fisheyes..

The calm before the storm.. All of the truck parts are in the paint booth ready to be painted!! Its magic time!

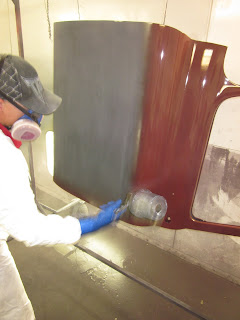
Eric painting one of the doors on the truck..

You're probably looking at the door thinking.. That looks sweet, but that doesn't look like the same color that the cab was painted with!! Well it is, but what you're seeing is only the base color.. Eric will later spray in the different metal flakes and then a clear coat to give it the color we saw on the cab earlier..

Here is the front hood being painted..

Once Eric has the first coat of paint on the entire hood, he'll spray rhino lining under the hood to make it stronger and should give the hood a clean appearance.

Hood looks great! Thats a lot of metal to paint!

Here is a great shot of the rear corner of the truck.. you can see the back and roof is now painted. It looks great!

The roof of the truck was in great shape to begin with and didn't require any metal work that I'm aware of.. The same could not be said regarding the gutters around the cab.. They were cleaned up and re-sealed early on in the project. They look brand new.. ok better than they looked when the truck was new from what I've heard.

There you have it! The first base coat is finished! I can't wait to see how they turn out after the metal flakes are applied and the clear coat goes on!